Building a Simple Avatar Generation API
Unlock the power of Python with a Flask-driven Avatar Generation API, mastering image manipulation and web serving in one go.
In this tutorial, we'll create a simple yet powerful Avatar Generation API using Flask and Pillow. This API will generate personalized avatars based on the initials provided by the user. Whether for forums, chat applications, or any user-based platform, avatars offer a way to visually represent users. Our API will serve these avatars directly in the browser, making it a versatile tool for developers.
Prerequisites
- Basic knowledge of Python.
- Flask and Pillow installed in your environment.
- An IDE or text editor for writing Python code.
Step 1: Setting Up Your Flask Application
First, ensure you have Flask and Pillow installed in your Python environment. If not, you can install them using pip:
pip install Flask Pillow
Create a new Python file named app.py and import Flask, send_file from Flask, and necessary modules from Pillow:
from flask import Flask, send_file
from PIL import Image, ImageDraw, ImageFont
Initialize your Flask application:
app = Flask(__name__)
Flask is a lightweight WSGI web application framework in Python that allows you to quickly build web applications. To begin, you create a new Python file (app.py), which will serve as the entry point for your application. The initial setup involves importing necessary modules and initializing the Flask app with Flask(__name__). This step is crucial as it sets the groundwork for your web server.
Step 2: Creating the Avatar Generator Function
Our avatar generator function will create an image with a colored background and the user's initials. We'll use Pillow (PIL) for image creation and manipulation.
Define the create_avatar function that takes initials, a background color, and a text color as arguments:
def create_avatar(initials, bgcolor="#567", textcolor="white"):
    img_size = (128, 128)
    img = Image.new('RGB', img_size, color=bgcolor)
    draw = ImageDraw.Draw(img)

    # Load the default font with a custom size
    font = ImageFont.load_default()

    # Calculate text width and height
    bounding_box = font.getbbox(initials)
    text_width = bounding_box[2] - bounding_box[0]
    text_height = bounding_box[3] - bounding_box[1]

    # Calculate position for centered text
    position = ((img_size[0] - text_width) / 2, (img_size[1] - text_height) / 2)

    draw.text(position, initials, fill=textcolor, font=font)
    return img
This function is at the heart of your application. Using Pillow (Python Imaging Library Fork), you dynamically generate images based on user input. Here's a breakdown of the process:
- Image Creation: You start by defining the size of the avatar and creating a new image with a solid background color using
Image.new(). This creates a blank canvas on which you'll draw the initials. - Drawing Text: The
ImageDraw.Draw(img)creates a drawing context that allows you to add text to the image. Before placing the text, you calculate its dimensions to ensure it's centered. Pillow'sfont.getbbox(initials)method returns the bounding box of the text, which you use to calculate its width and height. - Centering Text: With the text dimensions and image size known, you calculate the position where the text should start to ensure it's centered on the image. This involves some basic arithmetic to align the text's center with the image's center.
- Text Rendering: Finally, you render the text onto the image at the calculated position with the specified font and color.
Step 3: Setting Up the Flask Route
Next, set up a Flask route that takes user initials as part of the URL and generates an avatar based on those initials.
@app.route('/avatar/<initials>')
def avatar(initials):
    # Validate initials
    valid_initials = ''.join(filter(str.isalpha, initials)).upper()[:2]
    if not valid_initials:
        return "Invalid initials.", 400

    img = create_avatar(valid_initials)
    img_io = BytesIO()
    img.save(img_io, 'PNG')
    img_io.seek(0)

    return send_file(img_io, mimetype='image/png', as_attachment=False)
Flask routes are how your application responds to client requests to specific URLs. In this project, you define a route that captures initials from the URL and generates an avatar based on those initials.
- URL Parameters: The route
/avatar/<initials>dynamically accepts user initials as part of the URL. Flask captures this as a variable, which you then pass to your avatar generation function. - Validation: Before generating an avatar, you validate the initials to ensure they contain only alphabetic characters and limit them to a maximum of two. This step prevents unexpected input and standardizes the avatar generation.
- Image Serving: Instead of saving the generated image to a file and serving it, you use a
BytesIOstream as an in-memory file. This approach allows Flask to send the image directly to the client's browser without the need for temporary files on the server. It's efficient and simplifies cleanup.
Step 4: Running Your Flask Application
With the avatar generation logic and route in place, you can now run your Flask application.
if __name__ == '__main__':
    app.run(debug=True)
Start your application by running:
python app.py
Navigate to http://127.0.0.1:5000/avatar/JS in your browser, replacing JS with any initials you want to generate an avatar for. You should see the generated avatar displayed directly in the browser.
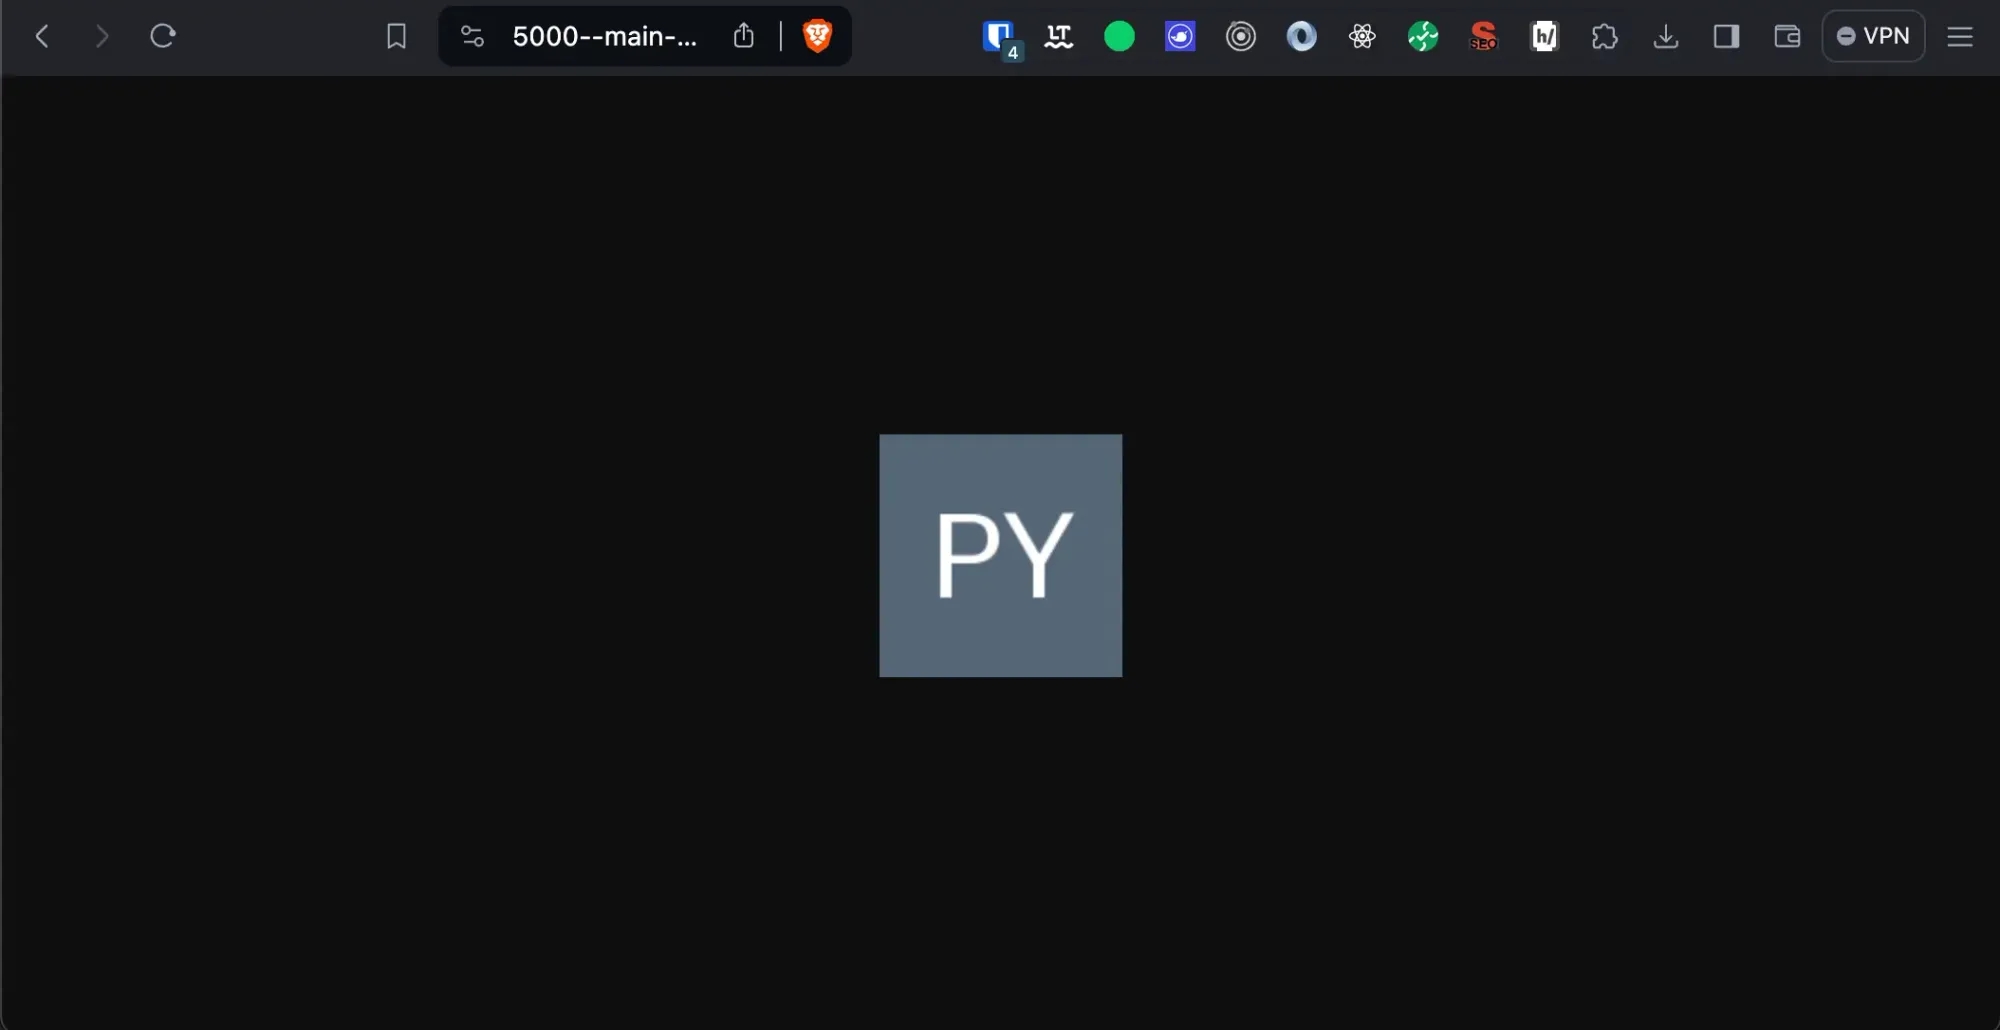
Running your Flask app starts a local web server that listens for incoming requests. By visiting the specified URL in a web browser, users trigger the route you've defined, causing Flask to execute the associated function (avatar) and display the generated avatar image.
When you execute app.run(debug=True), Flask runs in debug mode, which is useful during development as it provides detailed error messages and automatically reloads your app when changes are detected.
Conclusion
Congratulations! You've built a simple yet functional Avatar Generation API using Flask and Pillow. This API can be further customized and expanded with different shapes, colors, and font options for the avatars. You can deploy this API to a server or integrate it into existing web applications to dynamically generate user avatars.
By building this Simple Avatar Generation API, you've learned about handling HTTP requests, dynamic image generation, and serving content with Flask. This project can be a building block for more complex applications or services. Here are a few ideas for further exploration:
- Customization Options: Allow users to customize their avatars further by adding query parameters for different colors, shapes, or fonts.
- Performance Optimization: Explore caching mechanisms to store and quickly retrieve commonly requested avatars.
- Deployment: Look into deploying your Flask app to a cloud service like AWS, Heroku, or Google Cloud Platform to make it accessible online.
- Security Enhancements: Implement security best practices, such as validating all user inputs and handling exceptions gracefully to prevent misuse of your API.
This project not only enhances your Python and Flask skills but also encourages you to think about web services' design and user interaction. Happy coding, and enjoy exploring the possibilities!
Feel free to push your project to GitHub and share it with the community. This not only showcases your work but also helps others learn from your project. Happy coding!
 PYKITORG