Python Flask Tutorial For Beginners- A Step-By-Step Guide 2022
Python Flask Tutorial For Beginners- A Step-By-Step Guide 2022 - Flask Python Setup Using Ngrok Tunnel - Complete Tutorial With Example
Flask is a small framework by most standards—small enough to be called a “microframework” and small enough that once you become familiar with it, you will likely be able to read and understand all of its source code. But being small does not mean that it does less than other frameworks. Python Flask was designed as an extensible framework from the ground up; it provides a solid core with the basic services, while extensions provide the rest. Because you can pick and choose the extension packages that you want, you end up with a lean stack that has no bloat and does exactly what you need.
Python Flask is a module of Python that allows us to build web-based applications, APIs, etc. Flask has three main dependencies. The routing, debugging, and Web Server Gateway Interface (WSGI) subsystems come from Werkzeug; Jinja2 provides the template support, and the command-line integration comes from Click. These dependencies are all authored by Armin Ronacher, the author of Flask.
Creating and executing applications are very simple on local machines. But if we want to create an application that we can share with other users, developers, or peers to check the behavior in real-time before deploying it to the production environment, the process becomes time-consuming.
In this article, we will create a web-based application using the Python Flask module and share the app with anyone using a public URL provided by ngrok/ flask-ngrok. Let’s see the complete step-by-step Python Flask Tutorial with an example.
Installation | flask-ngrok | Python Flask
This library is compatible with Python 3.6+ versions.
pip install flask
pip install flask-ngrok
On Google-Colab/ Jupyter Notebook (In this article)
!pip install flask
!pip install flask-ngrok
Basic Structure Of Application
Initialization
All Flask applications must create an application instance. The web server passes all requests it receives from clients to this object for handling, using a protocol called Web Server Gateway Interface (WSGI, pronounced “wiz-ghee”). An application instance is an object of class Flask, usually created as follows:
from flask import Flask
app = Flask(__name__)
Please Note: The only required argument to the Flask class constructor is the name of the main module or package of the application. For most applications, Python’s name variable is the correct value for this argument.
Understand Routes
Clients such as web browsers send requests to the webserver, which in turn sends them to the Flask application instance. The Flask application instance needs to know what code it needs to run for each URL requested, so it keeps a mapping of URLs to Python functions.
The association between a URL and the function that handles it is called a route.
The most convenient way to define a route in a Flask application is through the app.route decorator which is exposed by the application instance.
The following example shows how a route is declared using this decorator:
@app.route("/")
def hello():
    return "Hello Friends! from Pykit.org. Thank you! for reading this article."
Creating A Simple Hello World Application Using Python Flask
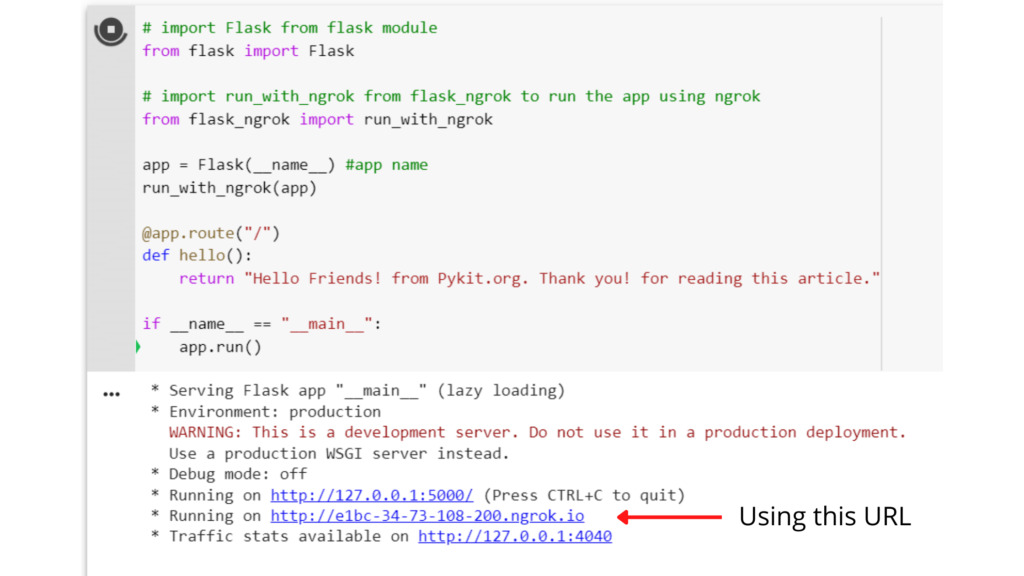
# import Flask from flask module
from flask import Flask

# import run_with_ngrok from flask_ngrok to run the app using ngrok
from flask_ngrok import run_with_ngrok

app = Flask(__name__) #app name
run_with_ngrok(app)

@app.route("/")
def hello():
    return "Hello Friends! from Pykit.org. Thank you! for reading this article."

if __name__ == "__main__":
    app.run()
Run the app by executing the Cell (or using python app_name.py).

Click on the URL (or copy and paste the URL in the new tab). A warning page will appear showing that the link may contain harmful content. Ignore this warning (because you know about this URL and its contents) by clicking on ‘visit this unsafe site’.

Congratulations! you have successfully created an application using Python’s Flask library and flask-ngrok which you can access from anywhere using the URL.
Note: The public URL will be accessible only till the time you are running the app in your system. The moment you stop or terminate the process, you will get an error message “Tunnel e1bc-34-73-108-200.ngrok.io not found ERR_NGROK_3200”.
In order to use the ngrok, we require to install ngrok and an AuthToken which we can get from here. I have explained each and every step in my Notebook file about “How to Setup Ngrok in Google Colab?”.
Python-based Flask module is also used to create web applications. Check out my article on Render HTML Template In Flask With CSS And JavaScript In 2022
Conclusion
In this article, we have discussed Python Flask and successfully installed the Python Flask and flask-ngrok modules in Google Colab. Further, we imported the modules then created a simple “Hello World” application, and run the application using ngrok tunnel. We have also accessed the public URL using our browser.


