How To Make an AI Chatbot In Python Using NLP (NLTK) In 2023
Build Your Own Chatbot Using Python NLP - How To Make AI Chatbot In Python Using NLP (NLTK) In 2023 Follow These Simple Steps- Pykit
Have you wondered how a computer-based application solves your query in seconds when you contact a customer support executive? A map-based application on your mobile tells you which direction to reach your destination safely even when you are not aware of the routes. Who are they and how do they manage to get your query resolved? Well! a simple answer is ‘they are chatbots’ and in this article, we will talk about AI Chatbot in Python (using NLTK): How to build a chatbot? Follow these 8 simple steps to create your own Chatbot in Python.
Chatbot or chatterbot is becoming very popular nowadays due to their Instantaneous response, 24-hour service, and ease of communication.
In this article, we will learn about different types of chatbots using Python, their advantages and disadvantages, and build a simple rule-based chatbot in Python (using NLTK) and Python Tkinter.
AI Chatbot In Python Using NLP (NLTK): How To Build A Chatbot?
The chatbot or chatterbot is a software application used to conduct an online chat conversation via text or text-to-speech, in lieu of providing direct contact with a live human agent.
The term “ChatterBot” was originally coined by Michael Mauldin (creator of the first Verbot) in 1994 to describe these conversational programs.
Today almost all industries use chatbots for providing a good customer service experience. In one of the reports published by Gartner, “ By 2022, 70% of white-collar workers will interact with conversational platforms on a daily basis”.
Chatbot In Python: Types of Python Chatbot
The chatbot is broadly classified into two types-
- Text-based chatbots for example Customer Support Assistant
- Voice-based or speech-based chatbots for example Google Home, Alexa, Apple Siri, Cortana
In this article, we will focus on text-based chatbots with the help of an example.
Text-based chatbots are further classified into two types-
- Rule-based
- Self-learn or AI (Artificial Intelligence) based
Rule-Based Chatbots
In Rule-based chatbots, the bot answers the queries based on some pre-defined rules on which it is trained.
Advantages
- Rule-based chatbots are easy or faster to train
- Accountable, Secure, and not restricted to text interactions
Disadvantages
- It is not capable of handling complex queries
- Interactions are not conversational
- It requires a lot of manual work to generate or prepare rules for training the chatbot
Self-Learn or AI-based chatbots
In a Self-learn or AI-based chatbot, the bots are machine learning-based programs that simulate human-like conversations using natural language processing (NLP).
Advantages
- Increase customer engagement by providing interactions conversational
- Increase productivity by providing quick data collection and better lead generation
Disadvantages
- It is difficult to train as it requires high computational power for example GPU, and RAM
- The cost of installation is high compared to rule-based chatbots
Industries using AI-based Python Chatbots
According to an article published in TheMagazine.ca, the top industries using chatbots are as follows-
- Healthcare
- Telecommunications
- Banking
- Financial Advice
- Insurance
- Government
- E-commerce Platform- Interacting with Customers for Feedback or Providing Support
- Social Media Platform- Business Pages/ Brands
- Top Companies uses Chatbot for Job Application/ Recruitment purpose
Building a Semi-Rule Based AI Chatbot in Python: Simple Chatbot Code In Python
The first and foremost thing before starting to build a chatbot is to understand the architecture. For example, how chatbots communicate with the users and model to provide an optimized output.
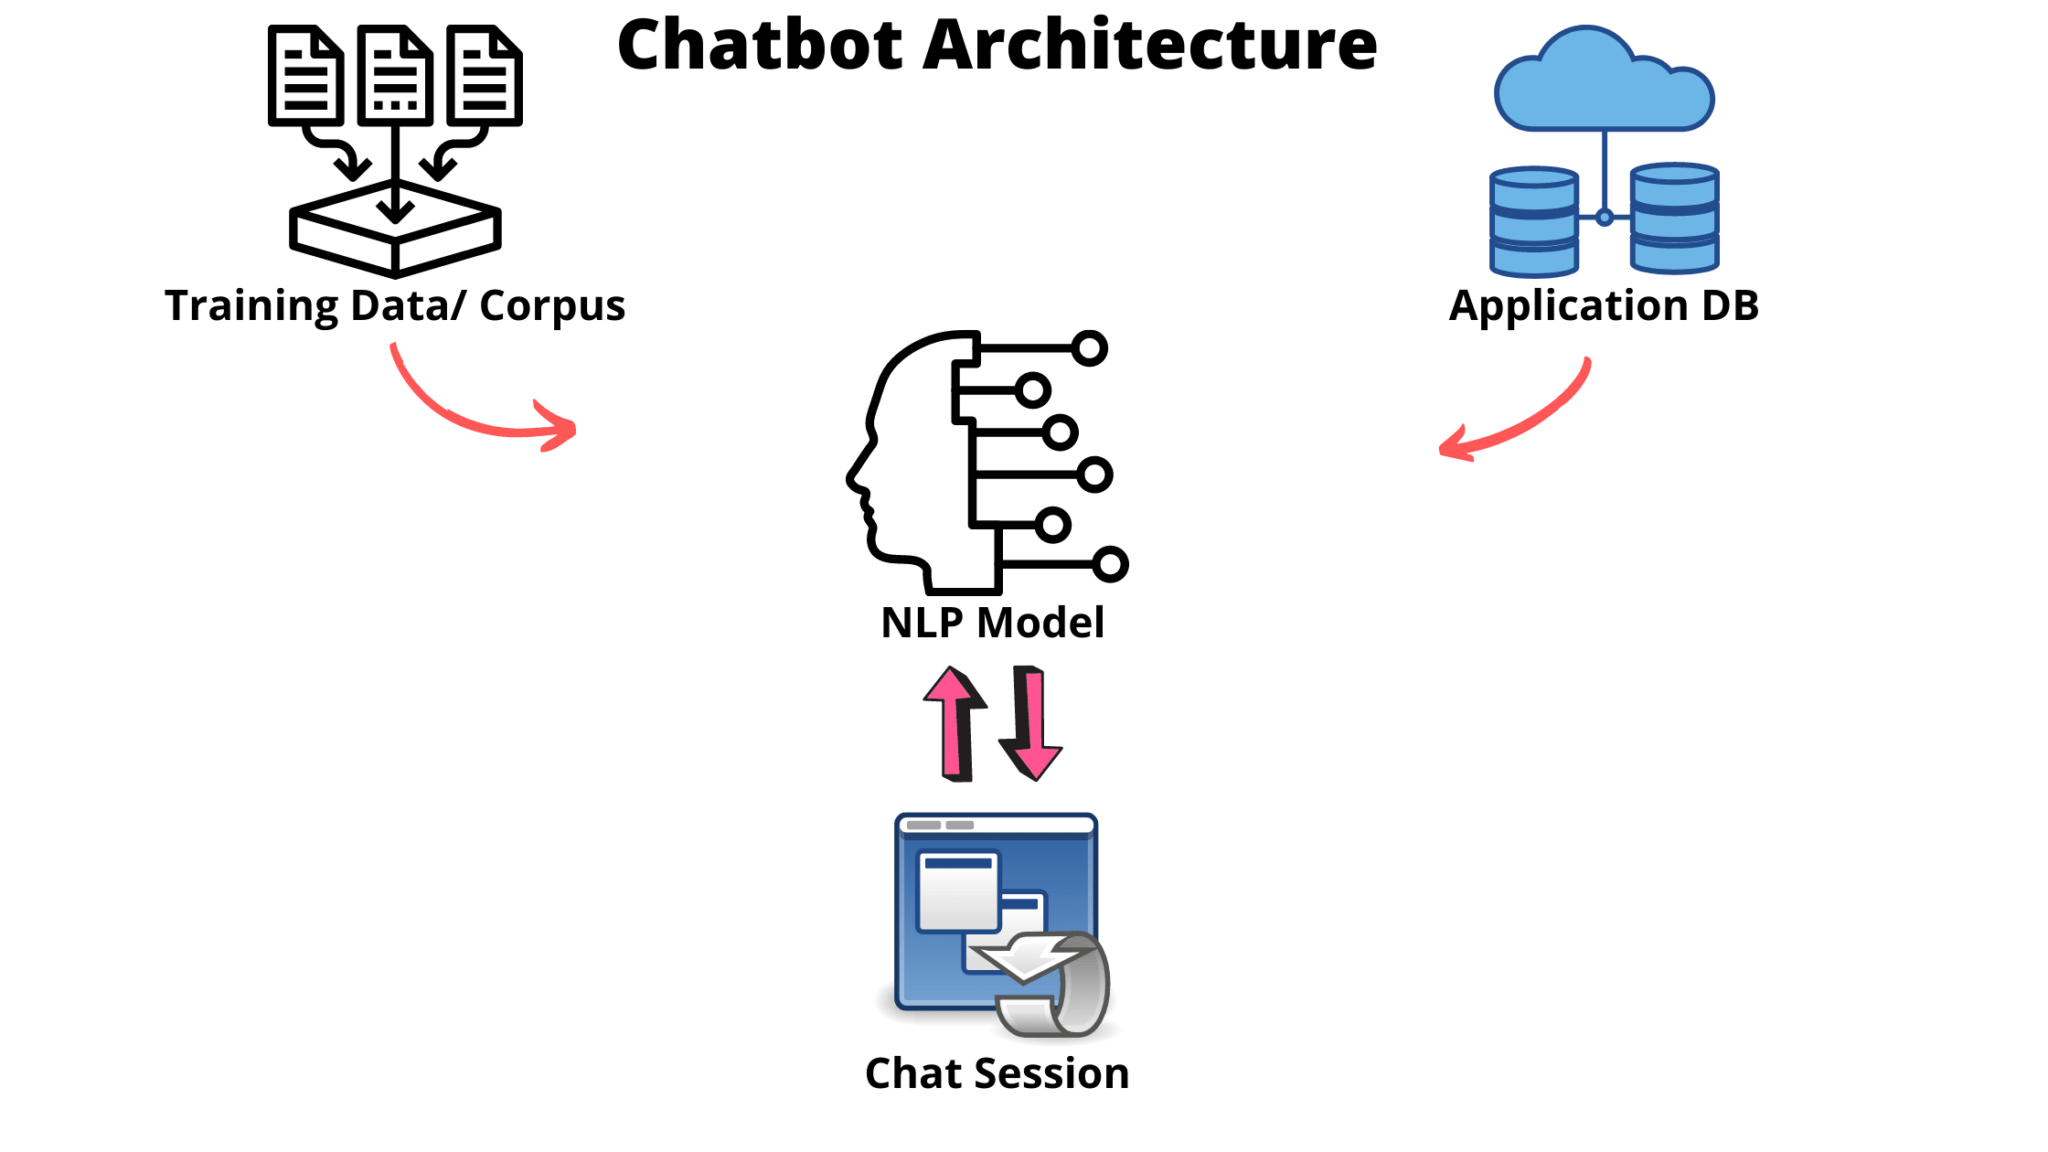
In the above image, we have Training Data/ Corpus, Application DB, NLP Model, and a Chat Session.
Training Data/ Corpus
In any machine learning model, we need a dataset using which we can train the model to predict the desired output. For example, to predict future sales we need historical data which can be used to fit the model.
In our case, the corpus or training data are a set of rules with various conversations of human interactions.
Curious about learning vector databases? Check out my article on Vector Database.
Corpus can be created or designed either manually or by using the accumulated data over time through the chatbot.
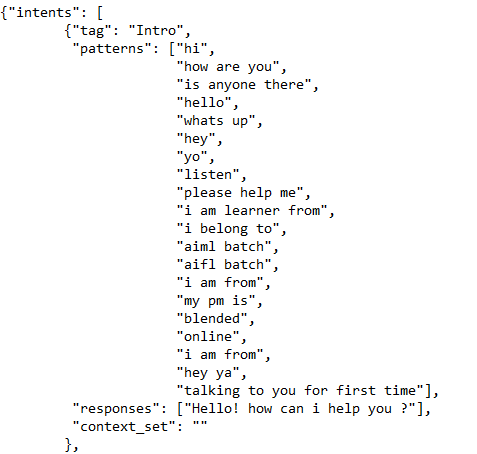
The above image shows the structure of a corpus that includes intents, tags, patterns, responses, and context.
Application DB
Application DB is used to process the actions performed by the chatbot.
NLP Model: The Natural Language Processing Model For Creating A Chatbot In Python
The NLP model is a Deep-Learning model. As per SAS, Natural language processing helps computers communicate with humans in their own language and scales other language-related tasks. For example, NLP makes it possible for computers to read text, hear speech, interpret it, measure sentiment, and determine which parts are important.
Chat Session/ User Interface
A chat session or User Interface is a frontend application used to interact between the chatbot and end-user.
Coding A Chatbot In Python: Writing A Simple Chatbot Code In Python
Let’s have a look at How to make a chatbot in python? We will divide the Jupyter Notebook into the followings steps
- Importing necessary libraries
- Data pre-processing
- Creating training data
- Creating a neural network model
- Create functions to take user input, pre-process the input, predict the class, and get the response
- Start the chatbot using the command line option
- Build the GUI using Python’s Tkinter library
- Start the chatbot using Tkinter GUI
Step 1. Importing necessary libraries
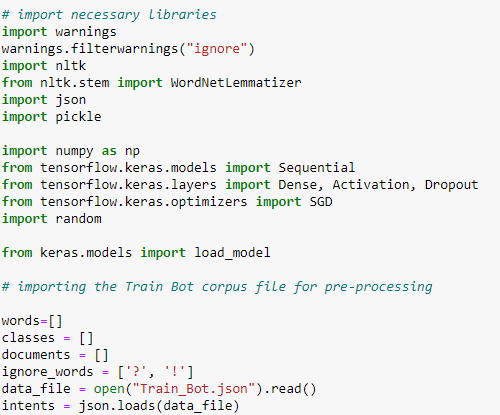
In the above image, we have imported all the necessary libraries. We will discuss most of it in later steps. In the first step only we have to import the JSON data which contains rules using which we have to train our NLP model. We have also created empty lists for words, classes, and documents.
Step 2. Data pre-processing
Data preprocessing can refer to the manipulation or dropping of data before it is used in order to ensure or enhance performance, and it is an important step in the data mining process. It takes the maximum time of any model-building exercise which is almost 70%.
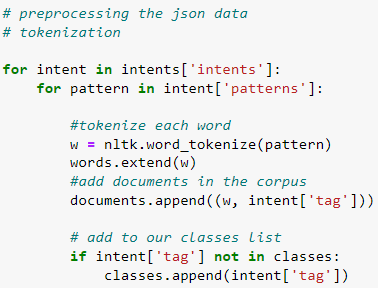
In the above image, we are using the Corpus Data which contains nested JSON values, and updating the existing empty lists of words, documents, and classes.
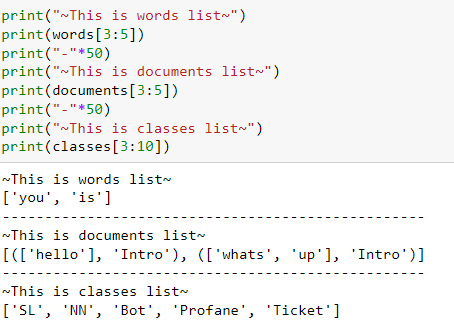
Tokenize or Tokenization is used to split a large sample of text or sentences into words. In the below image, I have shown the sample from each list we have created.

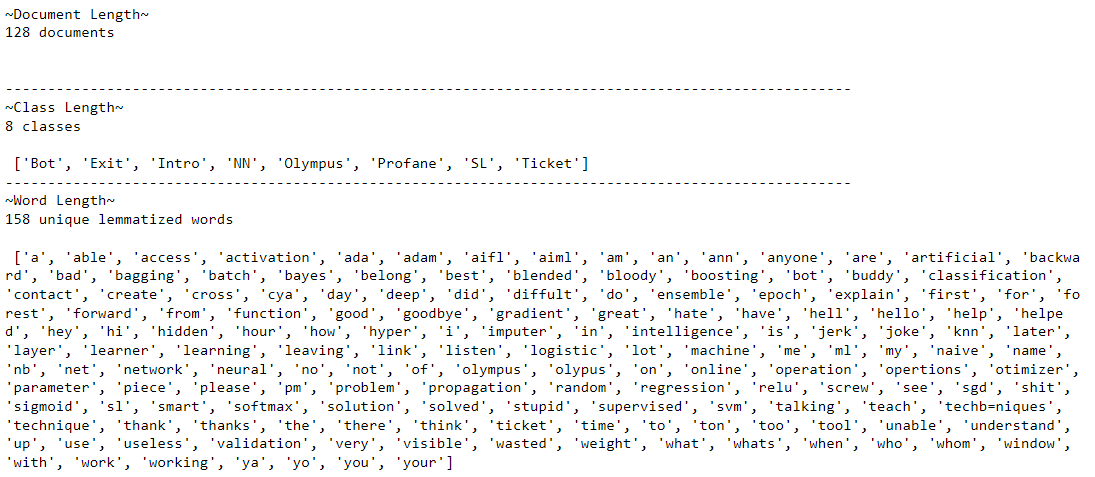
In the above output, we have observed a total of 128 documents, 8 classes, and 158 unique lemmatized words. We have also saved the words and classes for our future use.
Lemmatization
Lemmatization is grouping together the inflected forms of words into one word. For example, the root word or lemmatized word for trouble, troubling, troubled, and trouble is trouble. Using the same concept, we have a total of 128 unique root words present in our training dataset.
Step 3. Creating training data
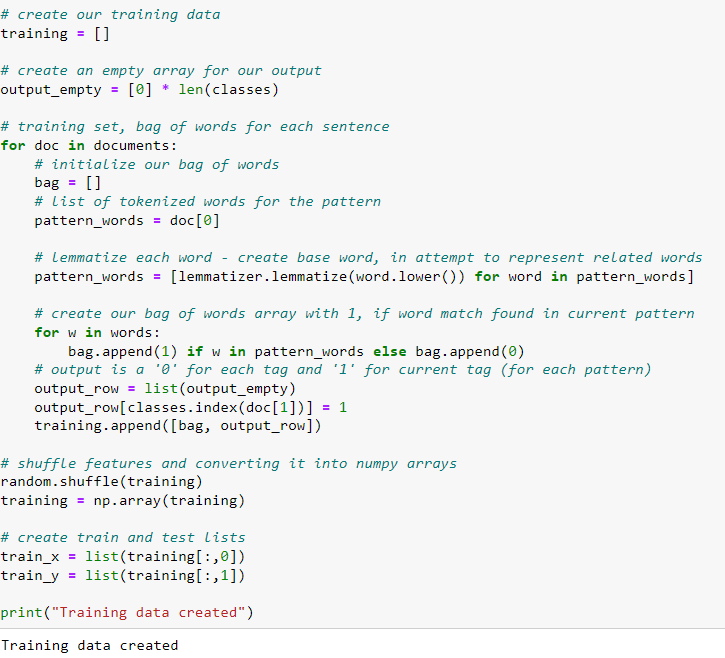
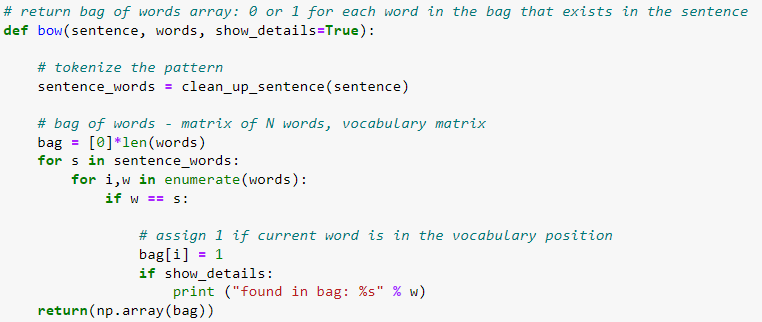
In the above image, we have created a bow (bag of words) for each sentence. Basically, a bag of words is a simple representation of each text in a sentence as the bag of its words.
For example, consider the following sentence “John likes to watch movies. Mary likes movies too”.

After creating the training dataset, we have to shuffle the data and convert the lists into NumPy array so that we can use it in our model.
Now, separate the features and target column from the training data as specified in the above image.
Step 4. Creating a neural network model
In this step, we will create a simple sequential NN model using one input layer (input shape will be the length of the document), one hidden layer, an output layer, and two dropout layers.
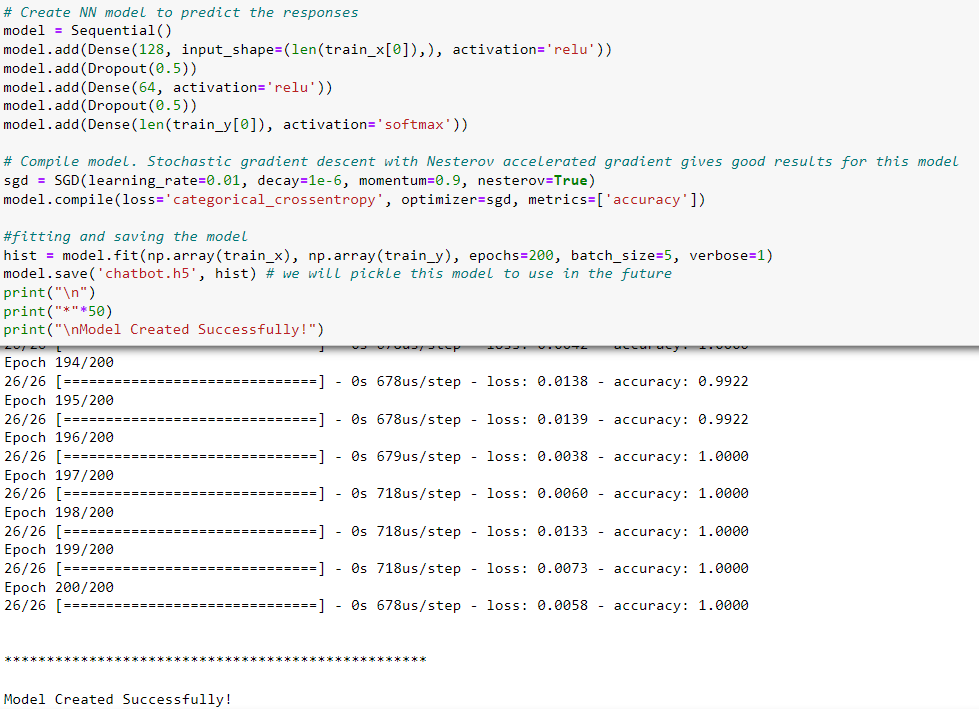
The summary of the model is shown in the below image.
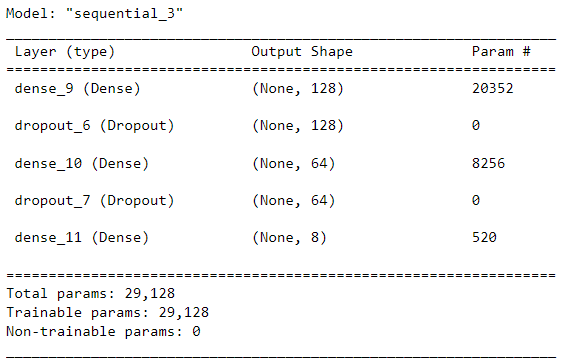
The accuracy of the above Neural Network model is almost 100% which is quite impressive. Also, we have saved the model for future use.
Interested in learning Python, read ‘Python API Requests- A Beginners Guide On API Python 2022‘.
Step 5. Create functions to take user input, pre-process the input, predict the class, and get the response
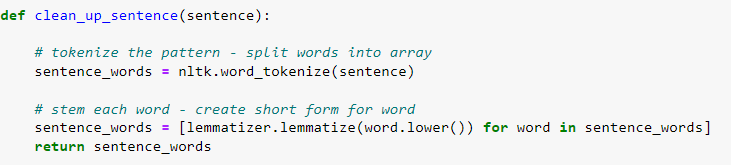
Function to clean the sentence or user input
Function to create bow (bag of words) using the clean sentence from the above step
Function to predict the target class
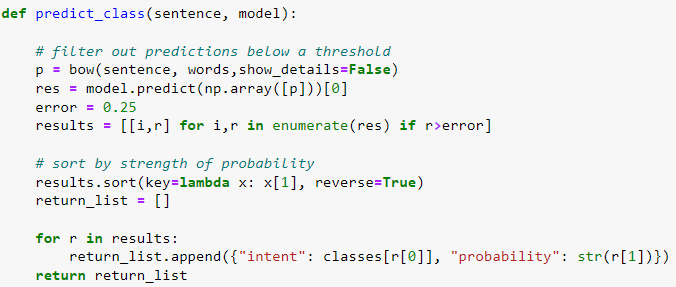
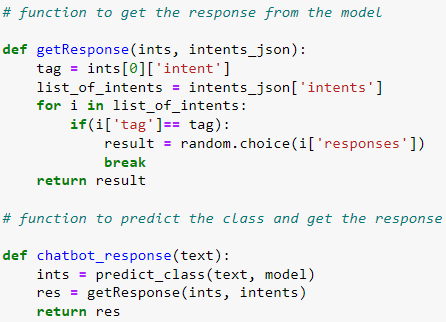
Function to get the response from the model
Function to start the chatbot which will run till the user type ‘end’
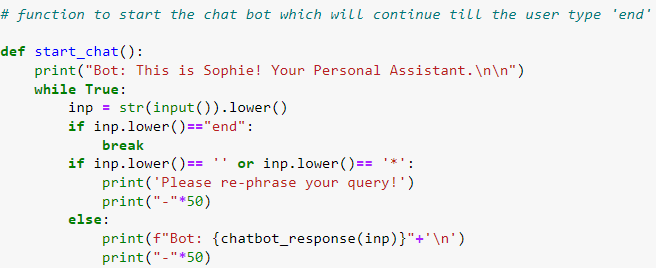
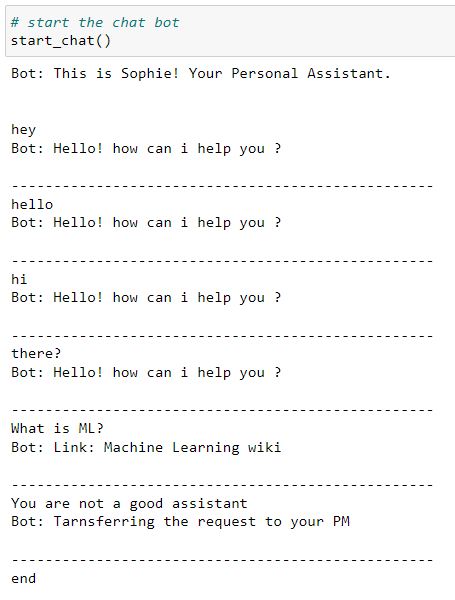
Step 6. Start the chatbot using the command line option
In the last step, we have created a function called ‘start_chat’ which will be used to start the chatbot. Refer to the below image.
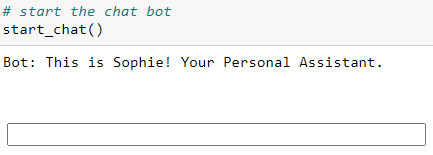
The message box will be used to pass the user input. The complete chat is shown below.
Step 7. Build the GUI using Python’s Tkinter library
Python’s Tkinter is a library in Python which is used to create a GUI-based application. It is a standard GUI library for python.
How to create a Tkinter App in Python is out of the scope of this article but you can refer to the official documentation for more information.
In the below image, I have used the Tkinter in python to create a GUI. Please note that if you are using Google Colab then Tkinter will not work. You have to use your local system/PC to use the Tkinter library.

In the above, we have created two functions, “greet_res()” to greet the user based on bot_greet and usr_greet lists and “send_msz()” to send the message to the user.
Step 8. Start the chatbot using Tkinter GUI

Congratulations! We have successfully created a chatbot that can respond based on user input. We can also use the Python Chatbot Library “Chatterbot”: See my article on “Chatterbot In Python“.
In the above example, we have successfully created a simple yet powerful semi-rule-based chatbot.
Complete Jupyter Notebook File- How to create a Chatbot using Natural Language Processing Model and Python Tkinter GUI Library.
Here is another example of a Chatbot Using a Python Project in which we have to determine the Potential Level of Accident Based on the accident description provided by the user. We have built a customized web-based UI. Also, created an API using the Python Flask for sending the request to predict the output.

Learning Resource

If you want to learn How to create or build a ChatGPT-like clone using Python and Streamlit UI, then read my article “Build a ChatGPT-like Clone using Python“
Further, If you want to explore “How we can deploy this Chatbot using Python Flask?” You can refer to my article on How to Run Python Flask App Online using Ngrok?
Conclusion
In this article, we have successfully discussed Chatbots and their types and created a semi-rule-based chatbot by cleaning the Corpus data, pre-processing, and training the Sequential NN model. We have discussed tokenization, a bag of words, and lemmatization, and also created a Python Tkinter-based GUI for our chatbot.


